Azure has its own SAML provider that is subtlety different to standard ADFS SAML and general SAML. The following guide is to help the deployment of an Azure SAML configuration as the authentication provider for Pyramid.
Note: This feature is available with Enterprise licensing only.
Important: If Same Site client security is set to Strict when using SAML authentication, this may cause a loop redirect between Pyramid and the SAML provider, as cookies are prevented from working across different web domains. This shouldn't be an issue if your SAML provider and Pyramid are within the same web domain.
Azure Setup
Step 1: Configure Azure Portal
Start by configuring your Azure portal. From the Homepage of your Azure portal, login to your Azure site, then go to Enterprise applications - All applications.
Next, click New Application and select the Non-gallery application button. Name your application and click Add.
Select the Single Sign-on tab and then select SAML.
Step 2: Specify SSO Details
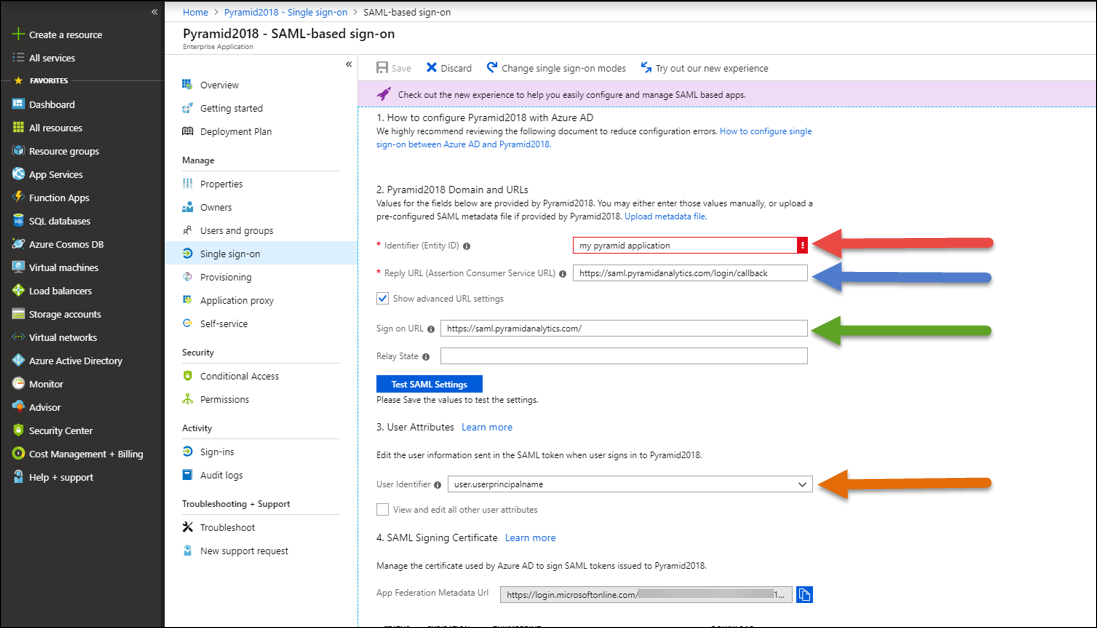
Enter the following details on your Azure portal single sign-on page:
- Identifier (Entity ID): Any name that is in the correct format for Azure (red arrow below).
- Reply URL (Assertion Consumer Service URL): The Pyramid website address with /login/callback - i.e. https://saml.pyramidanalytics.com/login/callback (blue arrow).
- Sign on URL: The Pyramid website address without any additions - https://saml.pyramidanalytics.com (green arrow).
- User Identifier: This should be user.userprincipalname (orange arrow).
Step 3: Capture SSO URLs
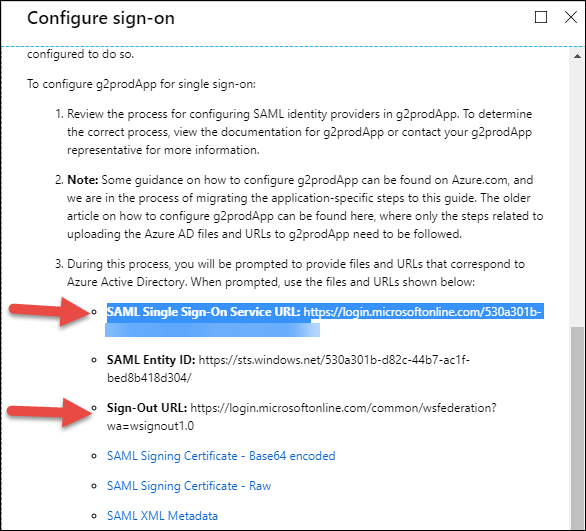
Click the Configure button to open the Configure sign-on pop-out (below). Copy both the SAML Single Sign-On Service URL and the Sign-Out URL and paste into Notepad. You will need these later to configure SAML settings in Pyramid.
Step 4: Save
Save your Azure settings
Step 5: Update Web.Config
Important: You must make this update on all Pyramid web servers that are running IIS.
An additional setting in IIS must be configured. By default, the web.config file can be found in the following location on all Pyramid web servers running IIS:
"C:\program files\pyramid\repository\iis\web.config"
Change your web.config file to the following:
<?xml version="1.0" encoding="UTF-8"?> <configuration> <system.webServer> <security> <requestFiltering> <requestLimits maxAllowedContentLength="2147483648" /> </requestFiltering> </security> <rewrite> <rules> <rule name="ReverseProxyInboundRule1" stopProcessing="true"> <match url="(.*)" /> <action type="Rewrite" url="http://localhost:8181/{R:1}" /> </rule> </rules> <outboundRules> <rule name="302" preCondition="302"> <match serverVariable="RESPONSE_Location" pattern="(.*)#redirect=(.*)" /> <action type="Rewrite" value="{R:2}" /> </rule> <preConditions> <preCondition name="302"> <add input="{RESPONSE_STATUS}" pattern="3[0-9][0-9]" /> </preCondition> </preConditions> </outboundRules> </rewrite> <defaultDocument> <files> <clear /> <add value="readme.html" /> </files> </defaultDocument> </system.webServer> </configuration>
Pyramid Setup
Step 6: Capture SAML Settings
Open Pyramid and go to the Admin console:
- From the main menu, click Security > Authentication.
- From the Provider drop-down, select SAML.
In the SAML Settings panel (blue arrow) in Pyramid, enter the following details as per the general SAML setup.
The details that are specific to Azure are:
- Vendor: Select Azure.
- Consumer URL: Use the sign on URL from Step 2 above.
- SAML Issuer: Use the Identifier (Entity ID) given from Step 2.
- IDP URL: Paste the SAML Single Sign-On Service URL copied in Step 3.
- Logout URL: Paste the Sign-Out URL copied in Step 3.
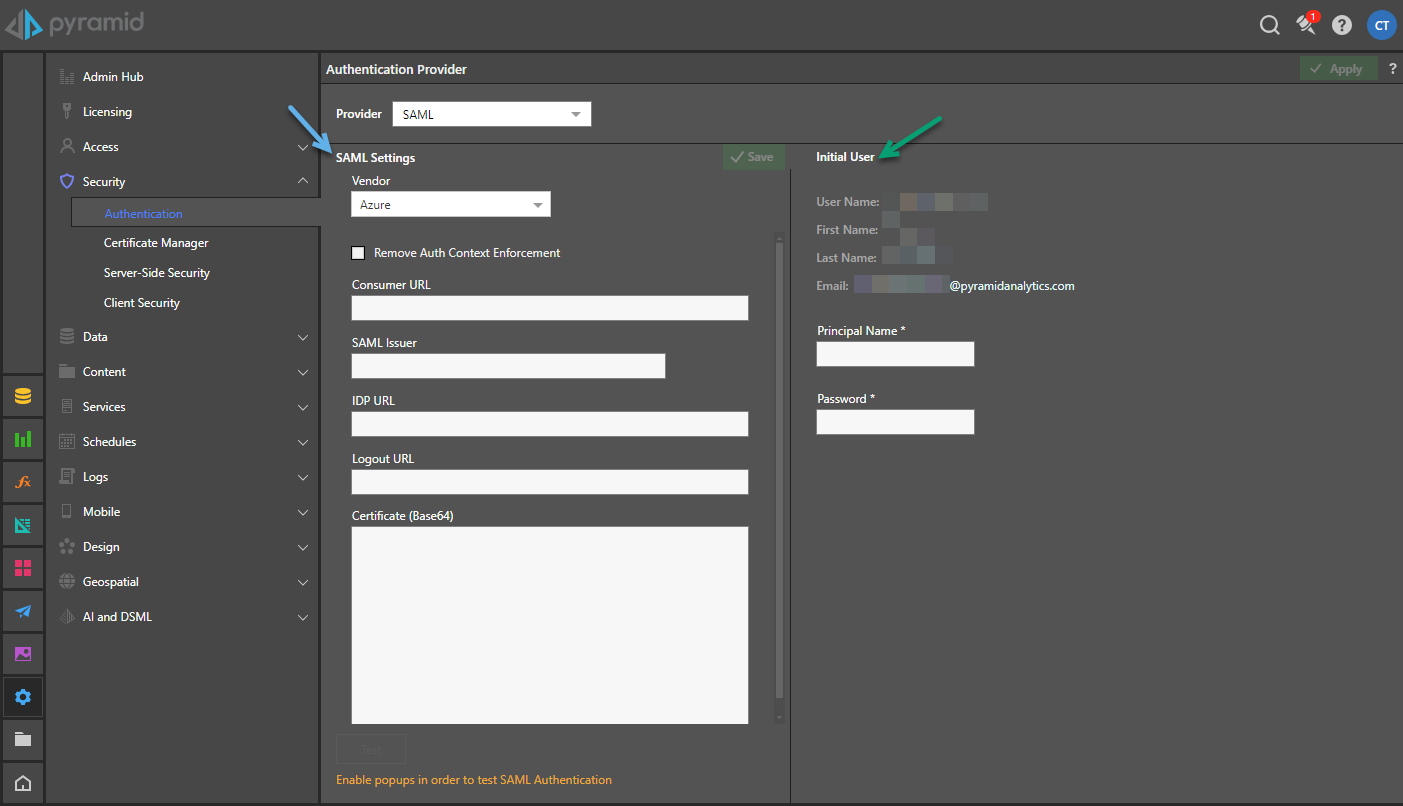
Step 7: Specify the Initial user details
Enter the credentials for the Initial User (green highlight above). The Initial User is typically the user who is responsible for the Pyramid configuration.
Note: The new Pyramid users must have a Principal Name that matches the user's user.userprincipalname (UPN) in Azure AD.
- User Name: The internal user name of the initial user. This is a bypass for the user when working outside of SAML.
- First Name: The first name of the initial user.
- Last Name: The last name of the initial user.
- Email: The email of the initial user.
- Principal Name: The SAML login ID of the initial user typically in the format someone@domain.com. This is the critical element that will enable Pyramid to match the incoming SAML assertion with the user account.
- Password: The internal password for the user. Only used if manually logging in without the SAML framework.
Tip: To login manually, you can use the /login/login.html or just /login entrypoints.
Step 8: Save your changes
There are two options for saving your changes:
- Click Save to update the current settings.
- Click Apply to change vendor / provider completely. This action will delete or disable all users.